If you’re working in embroidery or custom stitching, then you know the importance of proper file formats. Image to PXF file Conversion is the key to transforming logos, photographs, and detailed artwork into a format that embroidery machines can read accurately. Without this crucial step, even the most creative designs may result in misaligned stitches, thread breaks, or fuzzy details.
In this guide, we’ll explore everything about converting images to PXF files, why it’s essential, how it works, best practices, and tips for achieving professional embroidery results.
What Is a PXF File and Why It Matters
PXF is a specialized embroidery file format used by Pfaff embroidery machines. Similar to other machine formats, it contains all the stitching information your machine requires:
- Stitch type and length
- Stitch direction and order
- Color mapping
- Design path and density
Unlike static images such as JPG or PNG, a PXF file is dynamic; it's a set of instructions for your embroidery machine. Converting artwork into PXF ensures that the design will stitch accurately and consistently on fabric.
Why Image to PXF File Conversion Is Essential
Even the most stunning digital designs won’t translate well to fabric unless properly converted. Here’s why PXF conversion matters:
- Accuracy: Maintains the proportions, curves, and details of your original artwork.
- Efficiency: Reduces errors and trial-and-error stitching.
- Durability: Proper stitch density and underlay ensure embroidery lasts longer.
- Professional Appearance: Results in clean, sharp, and high-quality embroidery.
Whether you’re producing branded merchandise, custom apparel, or personal gifts, converting images to PXF ensures every stitch lands exactly where it should.
Supported Image Formats for PXF Conversion
A reliable PXF conversion process supports multiple image formats:
- JPG / PNG: Raster images commonly used for photos and basic logos.
- PDF: Often vector-based or high-resolution designs.
- AI / SVG: Fully scalable vector files, ideal for detailed logos and intricate designs.
With these supported formats, almost any artwork can be converted to PXF, ready for your Pfaff embroidery machine.
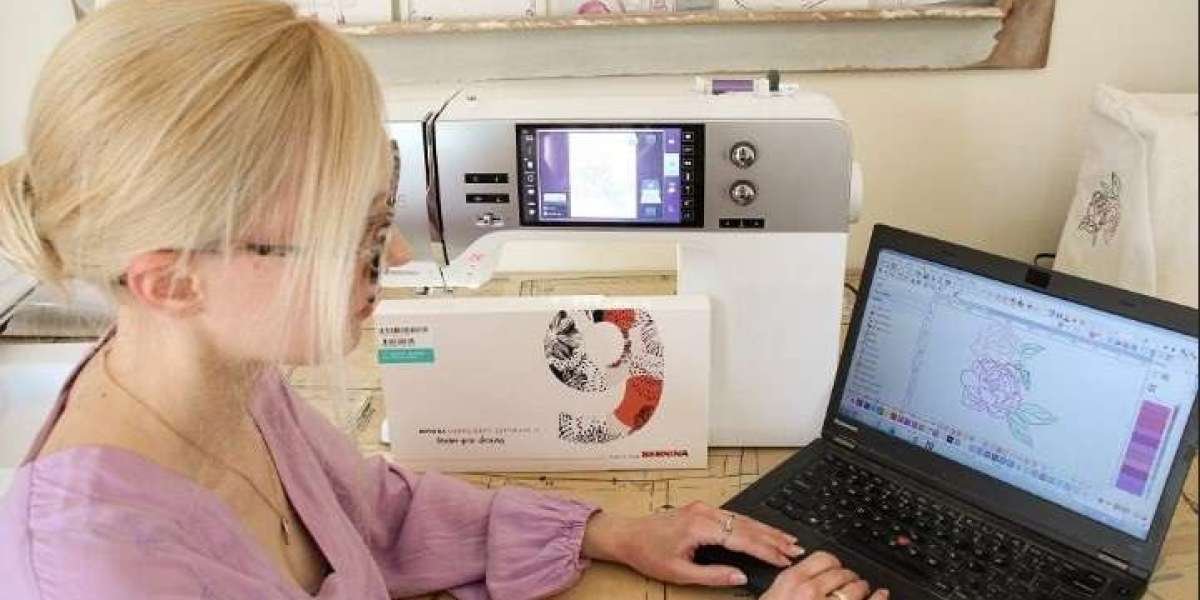
How Image to PXF File Conversion Works
PXF conversion can be done using automated software or manual digitizing. Here’s a typical process:
1. Import the Artwork
Start by importing the image file into the digitizing software. Higher resolution files yield better results, preserving detail and clarity.
2. Digitizing (Manual or Auto)
- Auto-digitizing: Automatically converts artwork into stitches. Useful for simple designs but may require corrections.
- Manual digitizing: Offers full control over stitch types, density, and stitch direction—ideal for logos, text, and detailed artwork.
3. Adjust Stitch Settings
Optimizing stitch density, length, and underlay is essential to prevent fabric puckering, thread breakage, and uneven stitching.
4. Preview & Test
Before exporting, preview the design and test-stitch key areas to ensure everything aligns perfectly.
5. Export as PXF
Once adjustments are complete, export the file as a PXF, making it ready for your embroidery machine.
Types of Designs Perfect for PXF Conversion
PXF files are versatile and can accommodate a variety of designs:
- Logos: Crisp and precise branding on uniforms, jackets, and merchandise.
- Photos: Simplified photographic designs can be converted into stitch patterns.
- Detailed Artwork: Intricate illustrations, patterns, and decorative elements.
No matter the complexity, proper conversion ensures that the final embroidered design matches your original vision.
Tips for Successful Image to PXF File Conversion
1. Use High-Quality Images
Low-resolution images result in poor stitch accuracy. Aim for at least 300 DPI for best results.
2. Simplify Small Details
Tiny or intricate details may not stitch well. Simplifying or enlarging these areas can improve the final output.
3. Choose the Right Stitch Types
- Satin for borders and small text
- Fill (tatami) for larger areas
- Running for fine lines and accents
Choosing the correct stitch type improves the look and durability of your embroidery.
4. Test Stitch Small Sections
Before running a full project, test stitch critical areas to ensure stitch density and alignment are correct.
5. Consider Fabric Type
Different fabrics require different stitch densities and underlay techniques to maintain design integrity.
6. Plan Color Selection
Careful thread color planning ensures designs are vibrant and details are visible against the fabric background.
Common Mistakes to Avoid
Even experienced users can make mistakes during PXF file conversion. Common pitfalls include:
- Converting low-resolution images
- Ignoring fabric type and thickness
- Overcomplicating tiny details
- Relying solely on auto-digitizing for complex designs
- Skipping test stitching
- Poor thread color selection
Avoiding these mistakes ensures high-quality, professional embroidery results every time.
Benefits of Professional PXF File Conversion
Hiring or using expert PXF file conversion services offers several advantages:
- Time-Saving: Quickly convert images into machine-ready files.
- High Accuracy: Designs are stitched exactly as intended.
- Consistency: Every embroidery piece is uniform and professional.
- Versatility: Supports logos, photos, and intricate artwork.
- Reduced Errors: Minimizes fabric puckering, thread breaks, and misaligned stitches.
These benefits are especially important for businesses, embroidery shops, and serious hobbyists.
Best Practices for Smooth PXF Conversion
- Start with the best-quality image or vector file possible.
- Remove unnecessary background elements.
- Simplify overly complex designs for embroidery-friendly paths.
- Test-stitch sample areas to confirm density and alignment.
- Document conversion settings for future use on similar designs.
- Use trusted software or professional digitizers for critical projects.
Following these best practices guarantees smoother, faster, and more reliable PXF file conversion.
Applications of PXF Files
PXF files are widely used in various embroidery applications:
- Corporate and team uniforms
- Hats, jackets, bags, and apparel
- Promotional products
- Personalized gifts
- Decorative patterns and artwork
With PXF conversion, you unlock the full potential of your Pfaff embroidery machine, producing accurate and repeatable designs every time.
Conclusion
Converting logos, photos, and detailed artwork into PXF files is essential for achieving clean, professional embroidery. Image to PXF file Conversion ensures that your embroidery machines interpret your designs accurately, delivering sharp, vibrant, and durable results. By following best practices starting with high-quality images, choosing proper stitch types, and testing designs you can elevate every embroidery project to a professional standard.
For fast, precise, and reliable PXF file conversion services that bring your designs to life, Digitizing Buddy provides expert solutions tailored to hobbyists, designers, and businesses alike.